DIY INVITATIONS
Most brides and former brides know that Weddings are expensive! And you really have to decide what to splurge on and what to cut back on. You spend hours looking at blogs for advice, dresses, jewelery, shoes, reception halls, hotels, flower for great findings and for the most part I can justify the cost of these tangibles. But if there is one thing that I think that is absolutely insane, it would be the cost of Invitations. After doing some research I finally made the decision to be a DIY Bride, at least when it came to my invitations!
There is always a way to cut cost, with out cutting corners. I have my artistic side to thank for putting these bad boys together. And my patience. I have not completely finished, but I wanted to share my findings and hopefully another young and in love couple will find this helpful one day!
If I could provide one word of advice it would be : Micheal's!
I spent well over an hour in Micheal's and my findings were AMAZING.
It is important to know your wedding colors before you buy anything. While searching I saw so many invitations I loved, but they did not come in the sage green color I was looking for. This was around time I started shopping for card stock. It would be wise to purchase really good glue, or a glue gun I got mine from Target for $4.00 (glue sticks included). Try to stay away from the kiddies Elmer's glue only because it will wrinkle your paper.
The sage green card stock ran me about .58 cents a sheet. Then I bought 2 packages of the ivory card stock for $5.00 each.
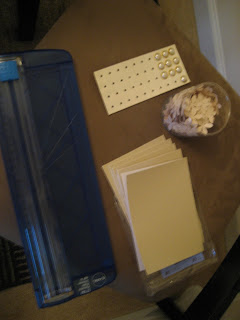
I tried cutting the paper myself and soon realized that straight lines where not in my future. So I purchase a paper cutter from Staples. You can see it below. It was only $12.00 and it saved me SOOO much time and hassle! While at Micheal's I also purchased a few embellishments. You can see below the pearls and flowers. I will be using them to give my invites a little more of that 'wow factor'. The Flowers were about $5.00 and the pearls ran around $3.00 a sheet. I got just enough for all my invites!
Before printing, find an invitation you love, but can't quiet afford. Try to use it's style and wording and create your own version of it. I printed mine at home on my computer and although I had to hit print a 100 times-I'd say it was worth it!
I knew I couldn't make the actual card itself on my own...so, I purchased some Pearlized ivory blank invitations cards along with matching envelopes. The cards have an elegant shimmer to them so they will still have the glamor effect I am going for.
Here you can see my little kit and caboodle! Martha Stewart has some great tools for purchase. I would highly recommend checking out her items if you are considering doing the DIY thing!
You can see here a printed invite with my fun flowers and pearls! I just love it and hopefully everyone else will enjoy what I have done. I think that deciding to do this on my own has 1) made it that much more personal and 2) saved me that much more money :)
Lets just hope these hold up in the mail!! Fingers crossed.
For my reply cards I ended up using scrap paper and small cards I found at target for $10.00. They even came with tiny envelopes! This part was easy...print, cut, paste and insert! 

Now, I am still working on putting the rest together and I don't want to ruin the surprise but you can see below what I have done so far. I created a pocket and I still have some work to do. It's been fun and while my wedding is still a ways away I am pleased with my progress and hopefully you are too!


I can't wait to see the finished product! You are so creative, Ali. I've actually forwarded this on to a couple of girlfriends who just got engaged, so hopefully you will help them too!
ReplyDeleteThanks Krissy! It's been a blast. :) I am excited to post the final invite. And thanks for forwarding this blog on - I hope someone find this helpful!
ReplyDelete